
- Key Takeaways
- Introduction: Google Business Profile
- Step No. 1 – Claim Your Business Listing
- Step No. 2 – Set Up Business Profile
- Step No. 3 – Choose Listing Features
- Step No. 4 – Post Regular Updates
- Step No. 5 – Ask for Consumer Reviews
- Step No. 6 – Read and Respond to Reviews
- Step No. 7 – Create FAQ Section
- Step No. 8 – Utilize Call Tracking Feature
- Step No. 9 – Monitor Built-In Analytics
- Step No. 10 – Create Offers for Customers
- Step No. 11 – Use Online Appointment Feature
- Step No. 12 – Add Photos and Virtual Office Tour
- Step No. 13 – Outline Your Service Areas on Google Maps
- Step No. 14 – Get Chat Alerts by Text
- Step No. 15 – Set Up a Custom E-Mail
- Step No. 16 – Activate Address Autocomplete
- Step No. 17 – Add Social Media Profiles
- Step No. 18 – Create External Links to Your Profile
- Step No. 19 – Create Additional Business Listings
- Step No. 20 – Claim Your Google Ads Credit
- Conclusion
Key Takeaways
- Guidelines from the Google Business Profile Help center;
- How to claim your Google Business Profile – free of charge;
- Best ways to set up your business profile to leverage local search intent;
- Measure your business profile performance by utilizing tracking metrics;
- How online reviews and reputation management can be a game-changer;
- Why relevance, distance and prominence are key criteria used by Google;
- How to maximize your chances of being included into Google’s “Local Pack”;
Introduction: Google Business Profile
I worked for 16+ years as a law office manager with a firm in Southern California, and oversaw online and offline marketing (Note: I was not employed at the law firm featured in the screenshot below).
We amassed a 4.5 Google Star Rating and served thousands of law clients.
This blog post will detail a 20-step guide we followed as closely as possible, which helped to turn our Google Business Profile into a highly-effective search engine optimization (SEO) lead magnet.
Nearly 50% of the 8.5 billion worldwide searches performed on Google each day, are done with local search intent – i.e., people are searching for products and services within their respective local communities.
That is why it is important for businesses to position themselves to take advantage of this local intent by setting up and optimizing a free Google Business Profile.
Step No. 1 – Claim Your Business Listing
One of the most important things a business can do to establish themselves as an authoritative industry source in their local marketplace is to set up and optimize their Google Business Profile.
Google has a section on their official support page which discusses how to add or claim your business profile – a short step by step guide and video tutorial for businesses to follow.
Step No. 2 – Set Up Business Profile
Now that you have claimed your Google Business listing, it is time to set and optimize your profile.
Google offers a Business Profile Manager under Google Apps (the nine-dot grid on the top right) that you can click and expand, once you are logged into your Google account. You’ll have the ability to manage your entire profile from here.
In order to give your business the best chance of showing up in the “Local Pack” (the Google Maps feature which usually showcases 3 local businesses and typically appears near the top of Google search engine results pages or SERPs), focus your attention on the following:
- Relevance – How closely does your business profile align with the intent of local searches?
- Proximity * – How much geographic distance exists between your business location and the actual individual conducting a search?
- Prominence – How prominent is your business in the local community? How much business goodwill have you established?
* Special Notes for Google Business Profile Listings:
If you are a service-area business, offer products or services remotely, but do not operate a brick-and-mortar location, then you would still be allowed to establish a Business Profile, as along as you make in-person contact with your customers.
Example: A real estate photography business.
If you are a service-area business, offer products or services remotely, do operate a brick-and-mortar location, but do not serve customers at your business address, then you would also be allowed to have a Business Profile.
Example: A plumbing contracting service.
If you are selling age-restricted products or services, then you would be required to have a physical storefront in order to maintain a Business Profile.
Examples: Firearms dealer, cannabis dispensary, or liquor store.
Otherwise, like the examples above, traditional brick-and-mortar and hybrid businesses (i.e., physical storefront + remote offerings), may designate the geographic areas they serve, such as a city like Los Angeles, or an entire county like San Diego.
Independent Contractors
Generally speaking, individuals or entities functioning in the role of an independent contractor, should establish their own Google Business Profile, separate and apart from any umbrella company under which they work.
The advent of the gig economy has made remote work much more common, with the number of independent contracts rising at a fast pace.
According to a study by Gallup which was commissioned by Intuit, almost one-third of Americans have been self-employed.
The following careers illustrate the wide variety of self-employment in our society today:
- CPAs
- Lawyers
- Veterinarians
- Photographers
- Auto mechanics
- Medical doctors
- Insurance agents
- Freelance writers
- Financial planners
- Landscape architects
- SEO/SEM professionals
- Ride-share drivers (e.g., Lyft)
- Real estate agents or Realtors
I could go on and on with this list, but I won’t.
Real estate agents are a great example. They have an “employing” broker, yet they function as independent contractors.
If an agent is working under a broker who owns and operates a Century 21 franchise, for example, that agent should (and Google allows them to) have their own Google Business Profile.
The profile can be set up to reflect their actual office address (if that applies), and should be designed to promote their own unique style of services or personal branding (hypothetical e.g., Robert M. Jones Team | Century 21).
Note: Since an employing broker is ultimately responsible for the actions of their agents, the broker should be consulted ahead of time.
Here is a Google Local Pack result, after using the keywords “Palo Alto CA real estate agents” in a search query:

Source: Google Search Engine.
Step No. 3 – Choose Listing Features
Google offers several key listing features that you will want to incorporate into your own business profile.
Name, Address, and Phone (NAP)
Make sure your company name, address, and phone number are accurate in your profile.
If you have more than one brick and mortar location in a metropolitan area for example, be sure your business name stays consistent, and your address and phone number reflect each specific location.
Hours of Operation
You want to be sure your operating hours reflect the times your business is open, including weekends and any holidays.
If you do not offer a walk-in location and only serve the public virtually, then you can indicate that you are open 24/7 (if you have a live operator or dedicated answering service), or that your staff is available to answer calls on specific days of the week, and between certain designated hours.
Note: Google will send you e-mail reminders during certain times of the year – especially around holidays – asking if you’d like to update your hours of operation for a particular holiday period.
For example, if you offer reduced hours on New Year’s Eve, and are closed on New Year’s Day, you can adjust your hours of operation in your business profile settings accordingly.
Article Posting
Your Google Business Profile gives you the ability to post “blog-like” articles that can be viewed by any visitor to your profile.
This is a great place to post informative articles, make company announcements, and display accolades your company may have earned. See full discussion in Step No. 4 below.
Consumer Reviews
Customer reviews can be a deal breaker when it comes to deciding which business a consumer is going to choose.
Forty-nine percent (49%) of today’s consumers trust online reviews, as much as word of mouth referrals from a friend or family member.
That’s why it is critical to respond to both good and bad feedback in as timely and diplomatic a manner as possible. See full discussion below in Steps No. 5 & 6.
Areas of Coverage
You can designate in which cities, counties, or regional areas your business offers products or services.
The Google Maps feature will show you an outline and verify the coverage area you selected.
See full discussion below in Step No. 13.
Booking Link
Activate the online appointment link in your Google Business Profile, so that a potential customer/client can set an appointment if they choose right from your profile without having to navigate to your website or another type of landing page.
Website Link
In addition to the NAP features we discussed above, including a link to the homepage of your website (or a dedicated landing page) in the appropriate section of your Google Business Profile, should be mandatory for every local listing.
Products or Services Offered
Create a list of all the product types or services you offer, and populate that section of your profile with as many clear and concise descriptions as possible.
This will immediately provide any visitor to your profile with a complete picture of your offerings, and will encourage them to discover more or serve as a screening tool.
Here is an example of a Google Business Profile listing for a personal injury law firm in downtown Los Angeles:
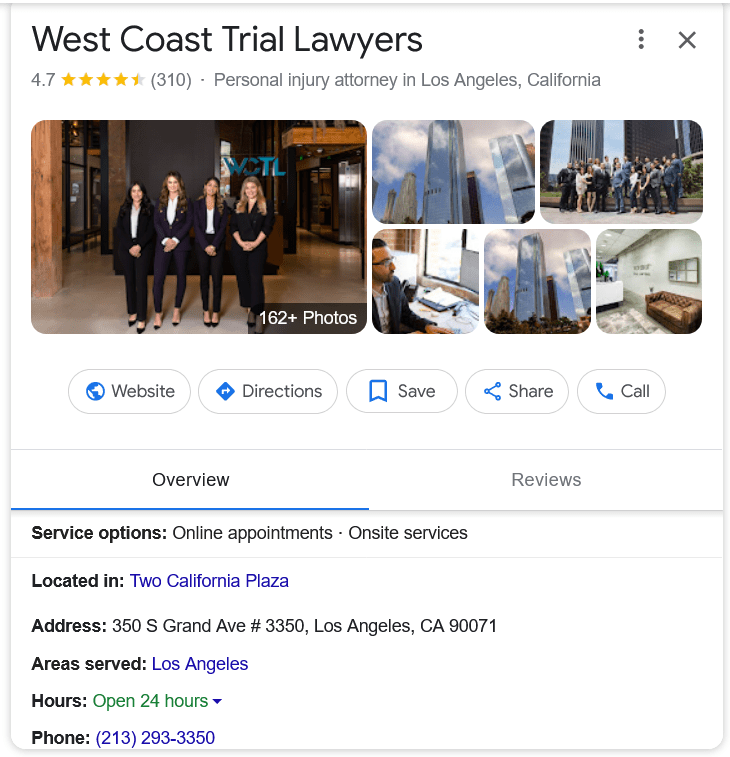
Source: Google Search Engine.
Managing Your Profile
Once you have set up your Google Business Profile with all of the listing features you’d like, here is the easiest way to regain access to your profile’s dashboard, in order to manage and update your overall listing:
- Sign in to your Google Account (the one you used to set up your profile)
- Open up Google Maps
- Perform a search query in Google Maps using the name of your business, along with the relevant city and state location
- Hypothetical example: ABC Law Firm, San Diego, California
- Your Google Business Profile will then be listed in the left-hand pane, with a Google Maps view listed to the right of your profile
- The top of your profile will show a link titled “Manage Your Business Profile” – open this link and you will be taken to your business profile dashboard
- Choose any of the dozen or so links – e.g., Edit Profile, Read Reviews, Bookings, Q & A, Add Update, and begin to edit your profile accordingly
- Be certain to SAVE all of your current updates – Google will specify how long it may take for your changes to be approved (this oftentimes occurs within a matter of a few minutes)
Step No. 4 – Post Regular Updates
This section can be used for publishing a variety of things such as offers, products, services, and events.
These will not only be reflected on your Google Business Profile, but will also be populated onto Google Search and Google Maps.
Google recommends that your posts be of high-quality, respectful and family-friendly.
If you offer products or services in a regulated industry such as gambling, alcohol or tobacco, you can still use the post feature, but you can not post any content related to the actual products themselves.
Step No. 5 – Ask for Consumer Reviews
You can send each of your customers a customized link to your profile, asking them to provide you with feedback on your products or services.
Reviews will help your business stand out more on both Google Search and Google Maps.
Google frowns upon offering incentives to customers in exchange for a consumer review.
However, you can still encourage them to leave a review by letting them know you value their feedback and relationship, and pointing out how quick and easy it is for them to leave a Google Star rating and a brief narrative on your profile.
Step No. 6 – Read and Respond to Reviews
Most potential customers these days read reviews before making a decision about what product or service they wish to pursue.
As mentioned above, nearly half of all consumers these days trust online reviews as much as word of mouth referrals!
A mix of good and bad reviews on a profile can actually come across as more genuine to a consumer as opposed to a profile which shows nothing but all good reviews, with no adverse feedback.
Reading and responding to all your reviews (good and bad) shows customers that you value their feedback, and also allows you to provide more context with which to highlight your products or services even further.
Step No. 7 – Create FAQ Section
There is a Q & A feature that every Google Business Profile can leverage to their advantage. Profile visitors can pose questions to the business owner.
However, you do not have to wait for a consumer to pose a question.
Every business can create their own set of FAQs, providing timely and valuable information about their products or services in a user-friendly format.
These FAQs may also appear across a variety of Google services such as Maps, Search, and YouTube.
Google has a Content Policy which addresses what type of material is and is not appropriate for publishing.
Step No. 8 – Utilize Call Tracking Feature
Google announced on May 28, 2024, that starting July 31, 2024, they will be removing the Call Tracking feature from all business profiles.
Hopefully, Google will decide to bring the call tracking feature back – or a similar tool – at some future point in time.
While in place, it was a great way to monitor what numbers called your business directly from your profile, how many calls were answered on a daily basis, and how many calls were missed on a daily basis.
Customers who called your business from Google Search were connected through a forwarding number.
You had the ability to track the exact date, time, and duration of each call, and could return each call directly from your business profile with a calling app, if you chose.
Important Note: Your business will still be able to receive customer calls directly from your Business Profile, minus the foregoing engagement and tracking features.
Step No. 9 – Monitor Built-In Analytics
The section of your business profile where analytical statistics are kept is called Performance.
This feature tracks overall Business Profile Interactions, Calls, Messages, Bookings and Website clicks or visits.
You will know on a month to month basis exactly how many people visited your profile, which can be used to compare to how many of those visitors actually converted into paying customers.
Step No. 10 – Create Offers for Customers
You may post offers that appear right on your Google Business Profile for customers to consider.
This section allows you to upload a photo or video, create an offer title (e.g., 25% off all camping equipment), and include a start date and an end date for your offer.
Step No. 11 – Use Online Appointment Feature
In the section titled Booking, you should add a link to a landing page on your website that will allow customers to immediately contact you, set an appointment, make a reservation, place an order, or submit a form request to your business for further information.
Step No. 12 – Add Photos and Virtual Office Tour
Adding photos of the inside and outside of your business location can be a very effective way to draw customers to your listing.
Including pictures of staff members can create an even more personalized experience. Some businesses have gone so far as uploading a virtual tour of their facilities.
Step No. 13 – Outline Your Service Areas on Google Maps

Google allows you to choose which geographic area(s) your business serves.
This can include a local municipality only, a countywide area, or an entire region such a Northern California.
The Google Maps diagram which appears next to your profile listing will highlight the area(s) of coverage you have chosen, so that customers will have a good visual representation of just how far your products or services reach.
Step No. 14 – Get Chat Alerts by Text
Google also announced in May 2024, that starting July 31, 2024, they will be removing the Chat Alerts by Text feature from all business profiles.
Messages was where a business could turn on SMS alerts to be sent out, every time a customer messages a business directly through their business profile’s chat feature.
You would receive a notification in your designated email inbox, that someone has sent you a message.
Important Note: Potential customers and clients may still locate and communicate with your business through Google Search and Google Maps – they can obtain more information about your business from your website links, business description, images, and other features you share on your Google Business Profile.
Step No. 15 – Set Up a Custom E-Mail
You may set up a free customized email address (e.g., service@your-business.com) through Google Workspace as part of your business profile.
As an alternative, you may also use a descriptive business email address (e.g., attorney-your name@gmail.com).
If you are using a regular gmail or yahoo account, for example, a customized business email address can present in a more professional manner.
Step No. 16 – Activate Address Autocomplete
If you have a brick and mortar location, this profile function from the Google Maps Platform will help your customers to enter the correct address and increase overall sales conversions.
Once set up, you will be provided with code that you can copy and paste right into your website.
Step No. 17 – Add Social Media Profiles
This feature is relatively new to the Google Business Profile platform, and may not be available in all regions.
You can add one (1) link to each of the following social media platforms: Facebook; Instagram; LinkedIn; Pinterest; TikTok; X (formerly known as Twitter); and YouTube.
If you have multiple business profiles (e.g., for separate physical locations) set up, you are allowed to add the same social media links across all of your profiles.
Adding links to your social profiles will help to build and reinforce the trust of your customers.
Step No. 18 – Create External Links to Your Profile
Incorporating external links on your website and social media accounts to your business profile, can be a great way to draw attention to your listing and encourage even more visitors.
Step No. 19 – Create Additional Business Listings
If you have multiple storefronts where customers can visit, then you will want to create a separate listing for each location, ensuring the NAP (name, address, phone number) features match with each distinct location.
Google does not allow more than one business profile at the same address, unless the businesses are legally distinct.
Your Google account will allow a maximum of ten (10) businesses to be added and managed under the same account.
Step No. 20 – Claim Your Google Ads Credit
SEO and PPC (pay-per-click) advertising can be a very potent combination for attracting new customers to your products or services.
Google offers Smart campaigns for businesses where you can create an ad in minutes, set a budget, and let them automatically manage your ads for you with the goal of getting maximum value for your budget.
Once you have established your business profile, Google will reach out and offer your business anywhere from $500.00 to $1,000.00 in Google Ads credits that you can use to start a PPC campaign.
Conclusion
Google has a very good Business Profile FAQs page, which is well worth checking out.
Have you ever set up a Google Business Profile for any type of product or service?
What features discussed above seem the most intriguing?
Would you recommend any other business profile steps that are not incorporated into this post?
Feel free to leave a comment below.
See you in the next regular blog post or the next edition of the Digital Marketing Snapshot Series…

very interesting and informative. Hopefully if you help me set something like this up it can boost my real estate business.
LikeLiked by 1 person